This is the blog section. It has two categories: News and Releases.
Files in these directories will be listed in reverse chronological order.
This is the blog section. It has two categories: News and Releases.
Files in these directories will be listed in reverse chronological order.
将博客clone到本地 尽量使用ssh地址 并再github上配置好公钥
git clone git@github.com:TbusOS/blog.git
在目录 content\zh\blog\build-environment 下按照已经有的文档写一篇文档
目前博客类的文章都放在这个目录
如果需要不同分类也可以按照blog这个目录下的文档复制一份进行修改
文章的Header按照已有的文章格式写下以下字段
linkTitle: "" # 链接地址
author: "Liulf" # 作者
categories: ["docs"]  # 分类
tags: ["blog","markdown","typora"] # tags 分类
title: "Hugo构建" # 标题
date: 2022-07-20 # 创建日期
weight: 3 # (这个是文章的顺序)
description: # 文章描述
写完文章后提交到仓库即可
git add .
git pus
至此完成一个完整的博客提交流程
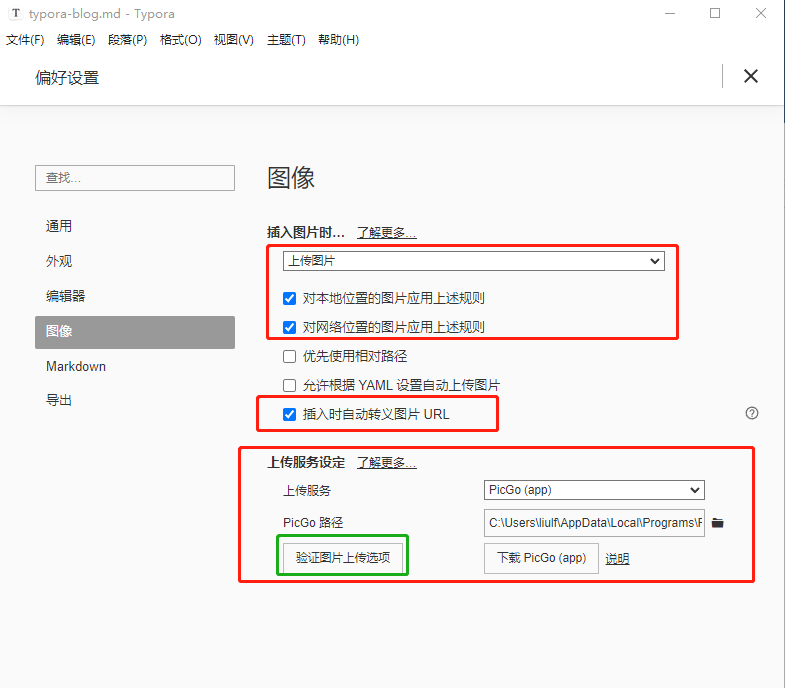
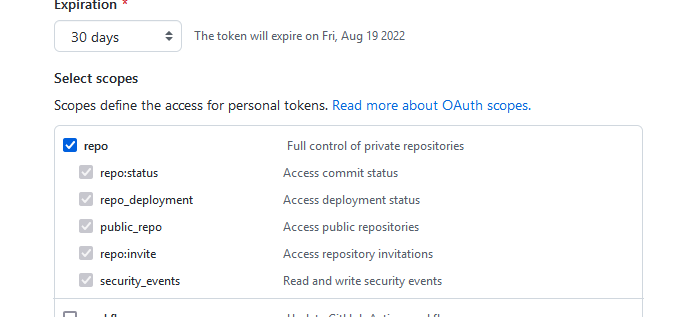
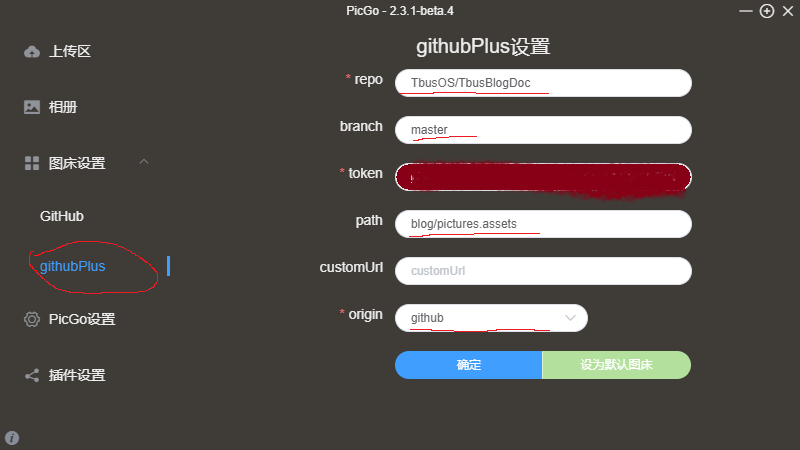
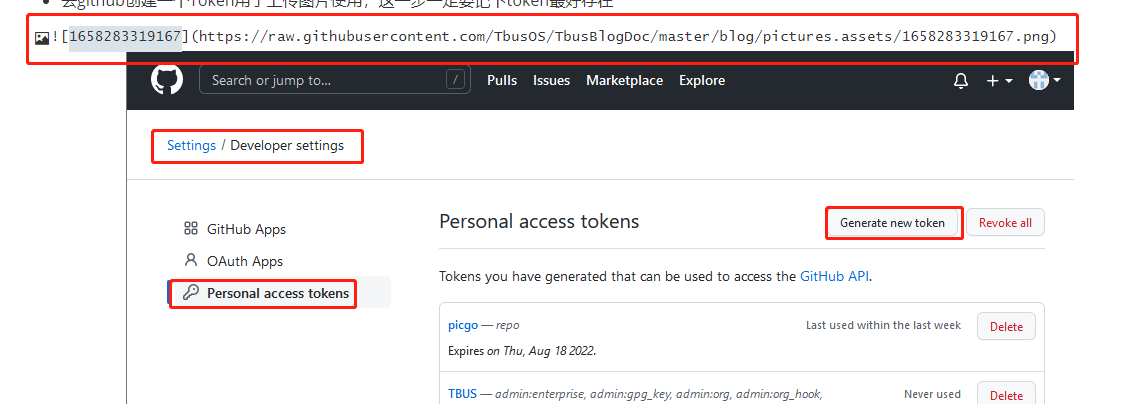
设置完成后点击下载PicGo下载PicGo
TBUS是什么车?这是去哪里的车?我要怎么样才可以上这辆车?
我们TBUS团队
我们是一个专注于技术学习与分享的团体,目前团队的正式成员涵盖国内顶尖IT技术人员
在这里我们边学习技术边做一些有趣的项目(小游戏,火车售票系统,聊天系统等),这些项目在Linux这个平台上实现。
这不是外包,也不是什么孵化器项目,完全是我们自己的意愿去做,我们想要成立的是一个团队,不是部门也不是其他,最主要是能够有一个学习的氛围,希望能够吸引更多人来这里面学习。
团队名称“TBUS”的构思源自我们团队成员 寓意如下:
Technology(技术)
我们团队的创始人
Unite(团结)
Share(分享)我们团队是以分享交流知识的形式成长的
此名字是上述团队关键字英文字母的拼接,又可以理解成为一辆学习技术(Technology)的巴士(Bus),走走停停,欢迎志同道合的人上车,结伴同行,一起学习技术,中途也会有一部分人由于种种原因下车。
本文最先发表于泰晓科技:
[https://tinylab.org/arm-wfe/]:
Zhang Binghua 创作于 2020/05/19
[TOC]
大家好,我叫张昺华,中间那个字和“饼”字一个读音,本人非常热衷技术,是个技术狂热者。
今天我想分享一个跟多核锁原理相关的东西,由于我搞 arm 居多,所以目前只研究了 arm 架构下的 WFE 指令,分享出来,如果有表述不精准或者错误的地方还请大家指出,非常感谢。研究这个原因也是只是想搞清楚所以然和来龙去脉,以后写代码可以更游刃有余。
偶然看 spin_lock 的 arm 架构下的 smp 源码的时候,发现了 wfe() 这个接口:
static inline void arch_spin_lock(arch_spinlock_t *lock)
{
	unsigned long tmp;
	u32 newval;
	arch_spinlock_t lockval;
	prefetchw(&lock->slock);
	__asm__ __volatile__(
"1: ldrex %0, [%3]\n"
" add %1, %0, %4\n"
" strex %2, %1, [%3]\n"
" teq %2, #0\n"
" bne 1b"
	: "=&r" (lockval), "=&r" (newval), "=&r" (tmp)
	: "r" (&lock->slock), "I" (1 << TICKET_SHIFT)
	: "cc");
	while (lockval.tickets.next != lockval.tickets.owner) {
		wfe();
		lockval.tickets.owner = READ_ONCE(lock->tickets.owner);
	}
	smp_mb();
}
我印象之前的 kernel 是没有这个 wfe 这个函数的,当 cpu0 获取到锁后,如果 cpu1 再想获取锁,此时会被 lock 住,然后进入死等的状态,那么 wfe 这个指令的作用是会让 cpu 进入 low power standby,这样可以降低功耗,本来发生竞态时其他的 cpu 都要等待这个锁释放才能运行,有了这个指令,相当于是“因祸得福”了,还可以降低功耗,当然这是有条件的,后面追溯并研究了一下 wfe 这个指令的作用。
首先 spin_lock 函数,搞内核的大家都知道,那么我把 linux-stable 的代码黏贴出来如下:
static __always_inline void spin_lock(spinlock_t *lock)
{
	raw_spin_lock(&lock->rlock);
}
#define raw_spin_lock(lock)	_raw_spin_lock(lock)
#ifndef CONFIG_INLINE_SPIN_LOCK
void __lockfunc _raw_spin_lock(raw_spinlock_t *lock)
{
	__raw_spin_lock(lock);
}
EXPORT_SYMBOL(_raw_spin_lock);
#endif
static inline void __raw_spin_lock(raw_spinlock_t *lock)
{
	preempt_disable();
	spin_acquire(&lock->dep_map, 0, 0, _RET_IP_);
	LOCK_CONTENDED(lock, do_raw_spin_trylock, do_raw_spin_lock);
}
/*
* We are now relying on the NMI watchdog to detect lockup instead of doing
* the detection here with an unfair lock which can cause problem of its own.
*/
void do_raw_spin_lock(raw_spinlock_t *lock)
{
	debug_spin_lock_before(lock);
	arch_spin_lock(&lock->raw_lock);
	mmiowb_spin_lock();
	debug_spin_lock_after(lock);
}
/*
* ARMv6 ticket-based spin-locking.
*
* A memory barrier is required after we get a lock, and before we
* release it, because V6 CPUs are assumed to have weakly ordered
* memory.
*/
static inline void arch_spin_lock(arch_spinlock_t *lock)
{
	unsigned long tmp;
	u32 newval;
	arch_spinlock_t lockval;
	prefetchw(&lock->slock);
	__asm__ __volatile__(
"1: ldrex %0, [%3]\n"
" add %1, %0, %4\n"
" strex %2, %1, [%3]\n"
" teq %2, #0\n"
" bne 1b"
	: "=&r" (lockval), "=&r" (newval), "=&r" (tmp)
	: "r" (&lock->slock), "I" (1 << TICKET_SHIFT)
	: "cc");
	while (lockval.tickets.next != lockval.tickets.owner) {
		wfe();
		lockval.tickets.owner = READ_ONCE(lock->tickets.owner);
	}
	smp_mb();
}
对于 arm32:
#if __LINUX_ARM_ARCH__ >= 7 || \
	(__LINUX_ARM_ARCH__ == 6 && defined(CONFIG_CPU_32v6K))
#define sev()	__asm__ __volatile__ ("sev" : : : "memory")
#define wfe()	__asm__ __volatile__ ("wfe" : : : "memory")
#define wfi()	__asm__ __volatile__ ("wfi" : : : "memory")
#else
#define wfe()	do { } while (0)
#endif
对于 arm64:
#define sev()		asm volatile("sev" : : : "memory")
#define wfe()		asm volatile("wfe" : : : "memory")
#define wfi()		asm volatile("wfi" : : : "memory")
static inline void arch_spin_unlock(arch_spinlock_t *lock)
{
	smp_mb();
	lock->tickets.owner++;
	dsb_sev();
}
#define SEV		__ALT_SMP_ASM(WASM(sev), WASM(nop))
static inline void dsb_sev(void)
{
	dsb(ishst);
	__asm__(SEV);
}
#ifdef CONFIG_SMP
#define __ALT_SMP_ASM(smp, up)						\
	"9998: " smp "\n"						\
	" .pushsection \".alt.smp.init\", \"a\"\n"		\
	" .long 9998b\n"					\
	" " up "\n"						\
	" .popsection\n"
#else
#define __ALT_SMP_ASM(smp, up)	up
#endif
以上我们可以看出,在 lock 的时候使用 WFE,在 unlock 的时候使用 SEV,这个必须要成对使用,原因我下面会说。
对于内核版本 Linux 3.0.56:
static inline void arch_spin_lock(arch_spinlock_t *lock)
{
	unsigned long tmp;
	__asm__ __volatile__(
"1: ldrex %0, [%1]\n"
" teq %0, #0\n"
	WFE("ne")
" strexeq %0, %2, [%1]\n"
" teqeq %0, #0\n"
" bne 1b"
	: "=&r" (tmp)
	: "r" (&lock->lock), "r" (1)
	: "cc");
	smp_mb();
}
对于 Linux 2.6.18:
define _raw_spin_lock(lock)     __raw_spin_lock(&(lock)->raw_lock)
static inline void __raw_spin_lock(raw_spinlock_t *lock)
{
    unsigned long tmp;
    __asm__ __volatile__(
"1: ldrex %0, [%1]\n"
" teq %0, #0\n"
" strexeq %0, %2, [%1]\n"
" teqeq %0, #0\n"
" bne 1b"
    : "=&r" (tmp)
    : "r" (&lock->lock), "r" (1)
    : "cc");
    smp_mb();
}
以上大家可以看出,最早期的 kernel 版本是没有 wfe 这条指令的,后面的版本才有。
那这条指令的作用是什么呢?我们可以上 arm 官网去查看这条指令的描述:ARM Software development tools
SEV
SEV causes an event to be signaled to all cores within a multiprocessor system. If SEV is implemented, WFE must also be implemented.
SEV 指令可以产生事件信号,发送给全部的 cpu,让他们唤醒。如果 SEV 实现了,那么 WFE 也必须被实现。这里的事件信号其实会表现为 Event register,这是个一 bit 的 register,如果有事件,那么此 bit 为真。
If the Event Register is not set, WFE suspends execution until one of the following events occurs:
• an IRQ interrupt, unless masked by the CPSR I-bit • an FIQ interrupt, unless masked by the CPSR F-bit • an Imprecise Data abort, unless masked by the CPSR A-bit • a Debug Entry request, if Debug is enabled • an Event signaled by another processor using the SEV instruction.
If the Event Register is set, WFE clears it and returns immediately. If WFE is implemented, SEV must also be implemented.
对于 WFE,如果 Event Register 没有设置,WFE 会让 cpu 进入 low-power state,直到下面列举的五个 events 产生,比如说中断等等都会唤醒当前因为 WFE 而 suspend 的cpu。
如果 Event Register 被设置了,那么 WFE 会直接返回,不让 cpu 进入low-power state,目的是因为既然有事件产生了,说明当前 cpu 需要干活,不能 suspend,所以才这样设计。
这里我很好奇 Event Register 到底是怎么理解的。因此需要阅读手册《ARM Architecture Reference Manual.pdf》,下面我会做说明。
WFI suspends execution until one of the following events occurs:
• an IRQ interrupt, regardless of the CPSR I-bit • an FIQ interrupt, regardless of the CPSR F-bit • an Imprecise Data abort, unless masked by the CPSR A-bit • a Debug Entry request, regardless of whether Debug is enabled.
而对于 WFI 这种,不会判断 Event register,暴力的直接让 cpu 进入 low-power state,直到有上述四个 events 产生才会唤醒 cpu。
注意,这里 WFE 比 WFI 多了一个唤醒特性:
an Event signaled by another processor using the SEV instruction.
也就是说 SEV 是不会唤醒 WFI 指令休眠的 cpu 的。这点需要特别注意。
接下来我谈下这个 Event Register 是怎么回事了。看这个文档《ARM Architecture Reference Manual.pdf》
The Event Register is a single bit register for each processor. When set, an event register indicates that an event has occurred, since the register was last cleared, that might require some action by the processor. Therefore, the processor must not suspend operation on issuing a WFE instruction.
The reset value of the Event Register is UNKNOWN.
The Event Register is set by:
• an SEV instruction • an event sent by some IMPLEMENTATION DEFINED mechanism • a debug event that causes entry into Debug state • an exception return.
As shown in this list, the Event Register might be set by IMPLEMENTATION DEFINED mechanisms. The Event Register is cleared only by a Wait For Event instruction. Software cannot read or write the value of the Event Register directly.
以上就是 Event Register 的表述,上述已经说的很明白了,Event Register 只有一个 bit,可以被 set 的情况总有四种大类型。当任意一个条件满足的时候,Event Register 都可以被 set,那么当 WFE 进入的时候会进行 Event Register 的判断,如果为真,就直接返回。
再来看看 WFE 的介绍:
Wait For Event is a hint instruction that permits the processor to enter a low-power state until one of a number of events occurs, including events signaled by executing the SEV instruction on any processor in the multiprocessor system. For more information, see Wait For Event and Send Event on page B1-1197.
In an implementation that includes the Virtualization Extensions, if HCR.TWE is set to 1, execution of a WFE instruction in a Non-secure mode other than Hyp mode generates a Hyp Trap exception if, ignoring the value of the HCR.TWE bit, conditions permit the processor to suspend execution. For more information see Trapping use of the WFI and WFE instructions on page B1-1249.
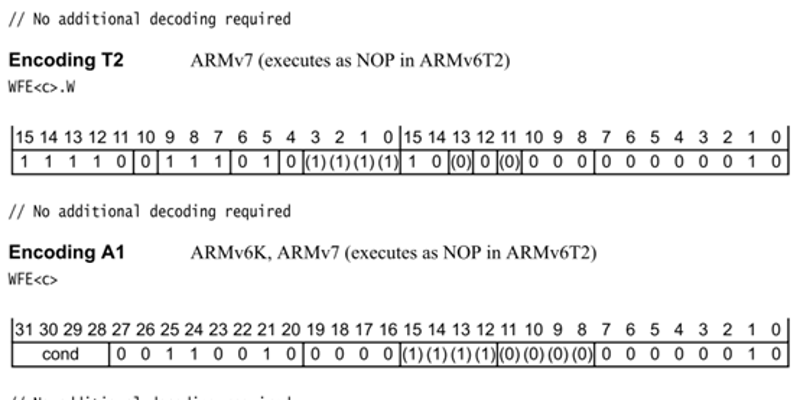
接下来上 WFE 这条指令的伪代码流程:
Assembler syntax
WFE{<c>}{<q>}
where:
<c>, <q> See Standard assembler syntax fields on page A8-285.
Operation
if ConditionPassed() then
    EncodingSpecificOperations();
    if EventRegistered() then
        ClearEventRegister();
    else
        if HaveVirtExt() && !IsSecure() && !CurrentModeIsHyp() && HCR.TWE == '1' then
            HSRString = Zeros(25);
            HSRString<0> = '1';
            WriteHSR('000001', HSRString);
            TakeHypTrapException();
        else
            WaitForEvent();
Exceptions
Hyp Trap.
看了上面这段 WFE 的伪代码,一目了然,首先判断 ConditionPassed(),这些函数大家可以在 arm 手册中查看其详细含义,如果 EventResigerted() 函数为真,也就是这个 1 bit 的寄存器为真,那么就清除此 bit,然后退出返回,不会让 cpu 进入 low power state;
如果不是异常处理,TakeHypTrapException(),那么就 WaitForEvent(),等待唤醒事件到来,到来了,就唤醒当前 cpu。
为什么有事件来了就直接返回呢,因为 WFE 的设计认为,如果此时有 event 事件,那么说明当前 cpu 要干活,那就没必要进入 low power state 模式。
如果没有事件产生,那么就可以进入 low power state 模式,因为 cpu 反正也是在等待锁,此时也干不了别的事情,还不如休眠还可以降低功耗。
当然,irq,fiq 等很多中断都可以让 WFE 休眠的 cpu 唤醒,那么这样做还有什么意义呢?比如说时钟中断是一直产生的,那么 cpu 很快就醒了啊,都不用等到发 SEV,那么既然是用 spin_lock,也可以在中断上半部使用,也可以在进程上下文,既然是自旋锁,就意味着保护的这段代码是要足够精简,不希望被其他东西打断,那么如果你保护的这部分代码非常长,这时候整个系统响应很可能会变慢,因为如果这时候有人也要使用这个锁的话,那么是否保护的这段代码设计上是有问题的。因此用 spin_lock 保护的函数尽可能要短,如果长的话可能需要换其他锁,或者考虑下是否真的要这么长的保护措施。
TakeHypTrapException(),是进入异常处理
Pseudocode description of taking the Hyp Trap exception
The TakeHypTrapException() pseudocode procedure describes how the processor takes the exception:
// TakeHypTrapException()
// ======================
TakeHypTrapException()
    // HypTrapException is caused by executing an instruction that is trapped to Hyp mode as a
    // result of a trap set by a bit in the HCR, HCPTR, HSTR or HDCR. By definition, it can only
    // be generated in a Non-secure mode other than Hyp mode.
    // Note that, when a Supervisor Call exception is taken to Hyp mode because HCR.TGE==1, this
    // is not a trap of the SVC instruction. See the TakeSVCException() pseudocode for this case.
    preferred_exceptn_return = if CPSR.T == '1' then PC-4 else PC-8;
    new_spsr_value = CPSR;
    EnterHypMode(new_spsr_value, preferred_exceptn_return, 20);
Additional pseudocode functions for exception handling on page B1-1221 defines the EnterHypMode() pseudocode
procedure.
arm spec
ClearEventRegister()
Clear the Event Register of the current processor 清除Event Register的bit
EventRegistered()
Determine whether the Event Register of the current processor is set Event Register bit为真,即被设置过
WaitForEvent()
Wait until WFE instruction completes
等待 Events 事件,有任何一个 Event 事件来临,都会唤醒当前被 WFE suspend 下去的 cpu, 如果是 SEV,会唤醒全部被 WFE suspend 下去的cpu。
如下是关于 WFE 的 wake up events 事件描述和列举:
WFE wake-up events
The following events are WFE wake-up events:
• the execution of an SEV instruction on any processor in the multiprocessor system • a physical IRQ interrupt, unless masked by the CPSR.I bit • a physical FIQ interrupt, unless masked by the CPSR.F bit • a physical asynchronous abort, unless masked by the CPSR.A bit • in Non-secure state in any mode other than Hyp mode: — when HCR.IMO is set to 1, a virtual IRQ interrupt, unless masked by the CPSR.I bit — when HCR.FMO is set to 1, a virtual FIQ interrupt, unless masked by the CPSR.F bit — when HCR.AMO is set to 1, a virtual asynchronous abort, unless masked by the CPSR.A bit • an asynchronous debug event, if invasive debug is enabled and the debug event is permitted • an event sent by the timer event stream, see Event streams on page B8-1934 • an event sent by some IMPLEMENTATION DEFINED mechanism.
In addition to the possible masking of WFE wake-up events shown in this list, when invasive debug is enabled and DBGDSCR[15:14] is not set to 0b00, DBGDSCR.INTdis can mask interrupts, including masking them acting as WFE wake-up events. For more information, see DBGDSCR, Debug Status and Control Register on page C11-2206. As shown in the list of wake-up events, an implementation can include IMPLEMENTATION DEFINED hardware mechanisms to generate wake-up events. NoteFor more information about CPSR masking see Asynchronous exception masking on page B1-1181. If the configuration of the masking controls provided by the Security Extensions, or Virtualization Extensions, mean that a CPSR mask bit cannot mask the corresponding exception, then the physical exception is a WFE wake-up event, regardless of the value of the CPSR mask bit.
接下来我们看下 WFI 的伪代码:
Assembler syntax
WFI{<c>}{<q>}
where:
<c>, <q> See Standard assembler syntax fields on page A8-285.
Operation
if ConditionPassed() then
    EncodingSpecificOperations();
    if HaveVirtExt() && !IsSecure() && !CurrentModeIsHyp() && HCR.TWI == '1' then
        HSRString = Zeros(25);
        HSRString<0> = '1';
        WriteHSR('000001', HSRString);
        TakeHypTrapException();
    else
        WaitForInterrupt();
Exceptions
Hyp Trap.
相关解释:
WFI
Wait For Interrupt is a hint instruction that permits the processor to enter a low-power state until one of a number of asynchronous events occurs. For more information, see Wait For Interrupt on page B1-1200. In an implementation that includes the Virtualization Extensions, if HCR.TWI is set to 1, execution of a WFE instruction in a Non-secure mode other than Hyp mode generates a Hyp Trap exception if, ignoring the value of the HCR.TWI bit, conditions permit the processor to suspend execution. For more information see Trapping use of the WFI and WFE instructions on page B1-1249.
以上我们可以看出,WFI 并没有去判断 event register,因此看伪代码可以很直观的看出 WFI 与 WFE 的区别。
以上是我个人的理解,如果有表述不精准或者不准确的地方还请大家指出,欢迎交流。
系统版本:Ubuntu Server 20.04 LTS 64bit 编译器:9.4.0 交叉编译器:arm-linux-gnueabi-gcc (Linaro GCC 7.5-2019.12) 7.5.0 linux内核:linux-5.15.53 busybox:1.35.0 QEMU:7.0.0 ninja-build:1.10.0
下载地址:Linaro Releases

tar xvf gcc-linaro-7.5.0-2019.12-x86_64_arm-linux-gnueabi.tar.tar	#解压
vi ~/.bashrc	#修改环境变量PATH,让系统先去指定目录寻找交叉编译链的可执行文件
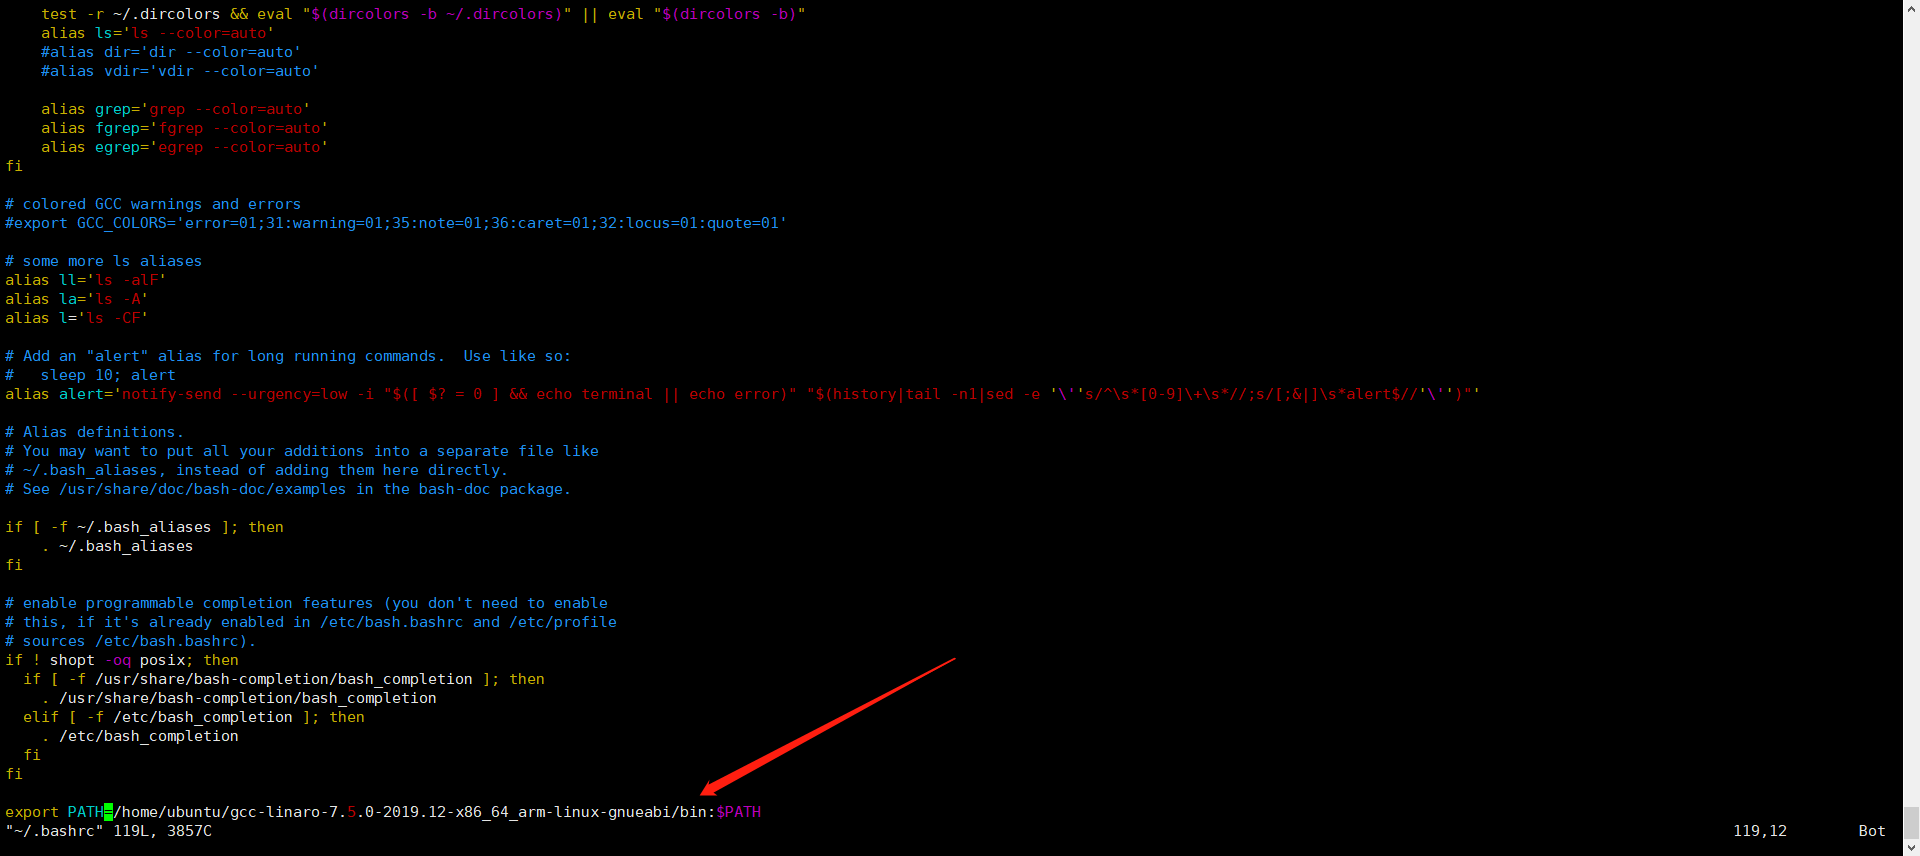 在.bashrc文件加上这行,交叉工具链的目录取决于自己解压的目录
export PATH=/home/ubuntu/gcc-linaro-7.5.0-2019.12-x86_64_arm-linux-gnueabi/bin:$PATH
在.bashrc文件加上这行,交叉工具链的目录取决于自己解压的目录
export PATH=/home/ubuntu/gcc-linaro-7.5.0-2019.12-x86_64_arm-linux-gnueabi/bin:$PATH
source ~/.bashrc #让.bashrc生效
安装成功

sudo apt-get install ninja-build	#Need ninja. Ninja is a small build system with a focus on speed.
wget https://download.qemu.org/qemu-7.0.0.tar.xz	#下载源码
tar xvf qemu-7.0.0.tar.xz	#解压
mkdir qemu_build && cd qemu_build	# 在下载目录新建文件夹build

# 以下均在/build目录下
../qemu-7.0.0/configure

make && make install	#出去喝杯咖啡,打两把游戏在来看结果
编译成功后,qemu-system-arm就生成在当前目录 和上面一样,将编译出的qemu的可执行文件的目录加入PATH环境变量。
vi ~/.bashrc #修改环境变量PATH
在.bashrc文件上次修改的基础上,重新修改 export PATH=/home/ubuntu/qemu_build:/home/ubuntu/gcc-linaro-7.5.0-2019.12-x86_64_arm-linux-gnueabi/bin:$PATH
source ~/.bashrc #让.bashrc生效
安装成功

内核代码下载地址:The Linux Kernel Archives
make ARCH=arm CROSS_COMPILE=arm-linux-gnueabi- vexpress_defconfig
make ARCH=arm CROSS_COMPILE=arm-linux-gnueabi- menuconfig
make ARCH=arm CROSS_COMPILE=arm-linux-gnueabi- -j2
ps:Versatile Express系统由ARM Ltd提供,作为CortexA9四核处理器的开发环境,硬件由uATX主板和CoreTile Express A9x4子板组成。
qemu-system-arm -M vexpress-a9 -m 128M -kernel ~/linux-5.15.53/arch/arm/boot/zImage -dtb ~/linux-5.15.53/arch/arm/boot/dts/vexpress-v2p-ca9.dtb -nographic
ps:内核和设备树的路径每个人可能不一样,需要自己注意下
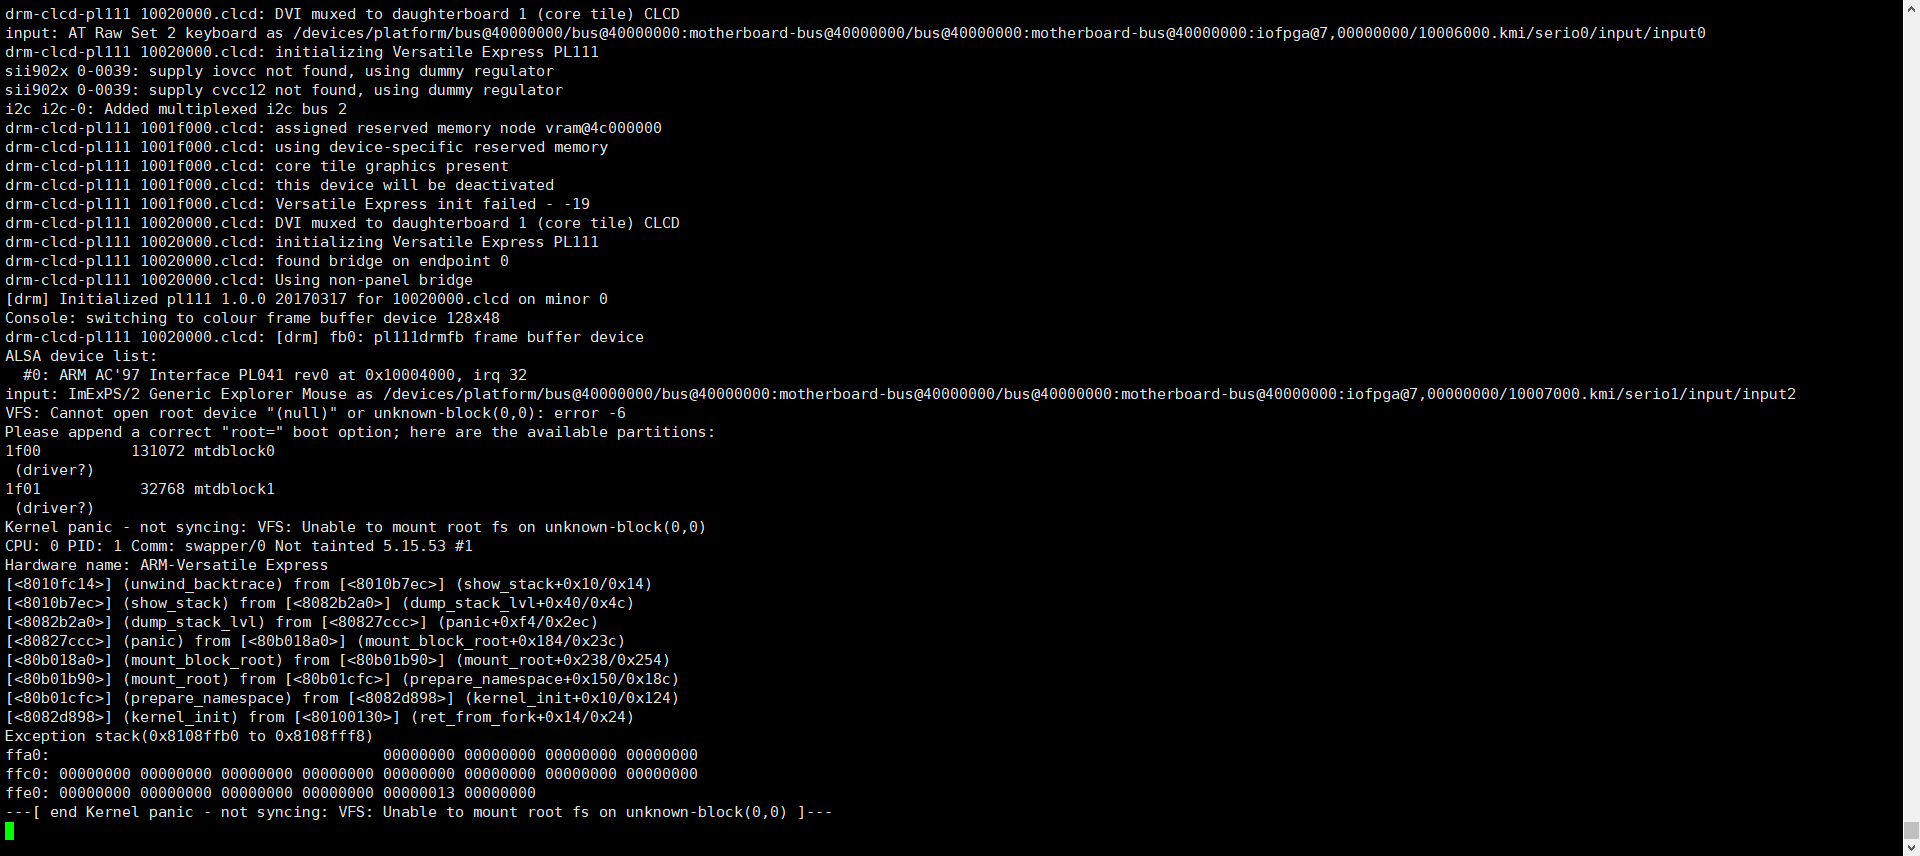 启动成功,但还没有文件系统,操作系统稍后制作。
输入ctrl+A+x退出qemu
启动成功,但还没有文件系统,操作系统稍后制作。
输入ctrl+A+x退出qemu
wget https://busybox.net/downloads/busybox-1.35.0.tar.bz2	#下载源码
tar xvf busybox-1.35.0.tar.bz2	#解压
cd busybox-1.35.0/
make ARCH=arm CROSS_COMPILE=arm-linux-gnueabi- defconfig
make ARCH=arm CROSS_COMPILE=arm-linux-gnueabi- menuconfig
Settings —>
- [*] Build static binary (no shared libs) #使用静态库
make ARCH=arm CROSS_COMPILE=arm-linux-gnueabi- -j4
make ARCH=arm CROSS_COMPILE=arm-linux-gnueabi- install
mkdir -p rootfs/{dev,etc/init.d,lib,proc,sys}   #创建根目录

cp -raf busybox-1.35.0/_install/* rootfs        #拷贝busybox命令到根目录

sudo mknod -m 666 rootfs/dev/tty1 c 4 1			#创建4个tty端终设备
sudo mknod -m 666 rootfs/dev/tty1 c 4 2
sudo mknod -m 666 rootfs/dev/tty2 c 4 2
sudo mknod -m 666 rootfs/dev/tty3 c 4 3
sudo mknod -m 666 rootfs/dev/tty4 c 4 4
sudo mknod -m 666 rootfs/dev/console c 5 1		#创建console字符设备
sudo mknod -m 666 rootfs/dev/null c 1 3			#创建null 字符设备

vim rootfs/etc/init.d/rcS						#输入如下内容
#!/bin/bash
mount -t proc proc /proc
mount -t sysfs sysfs /sys
/sbin/mdev -s
echo /sbin/mdev > /proc/sys/kernel/hotplug      #支持热插拔
sudo chmod +x rootfs/etc/init.d/rcS
cd rootfs
find ./ | cpio -o --format=newc > ./rootfs.img
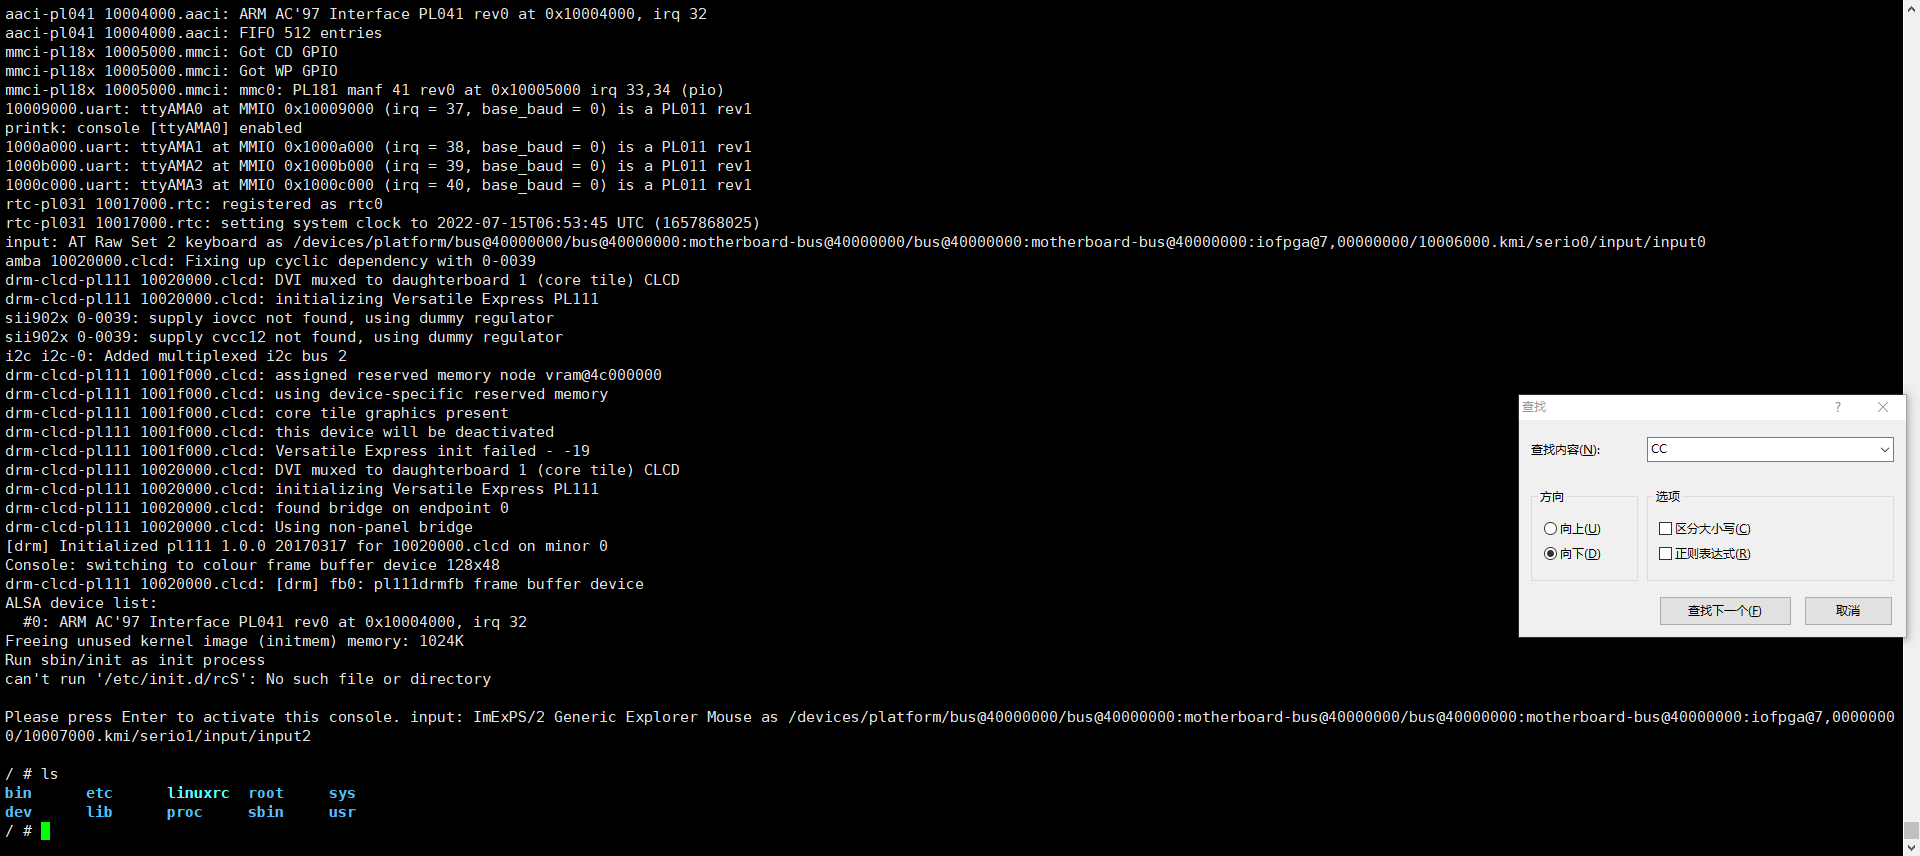
qemu-system-arm -M vexpress-a9 -m 128M -kernel linux-5.15.53/arch/arm/boot/zImage -dtb linux-5.15.53/arch/arm/boot/dts/vexpress-v2p-ca9.dtb -append "root=/dev/ram rdinit=sbin/init console=ttyAMA0" -nographic -initrd rootfs/rootfs.img
启动成功